上一次学习 web 开发还是在上一次。
经过了三天的前端学习后,我终于准备开始学习 FullStack 了。
仔细想了想,还是不要待在 comfort zone 里,干脆直接学 js 全栈,也可以提高 js 的熟练度。
Day0
衔接上一次的 Day3.
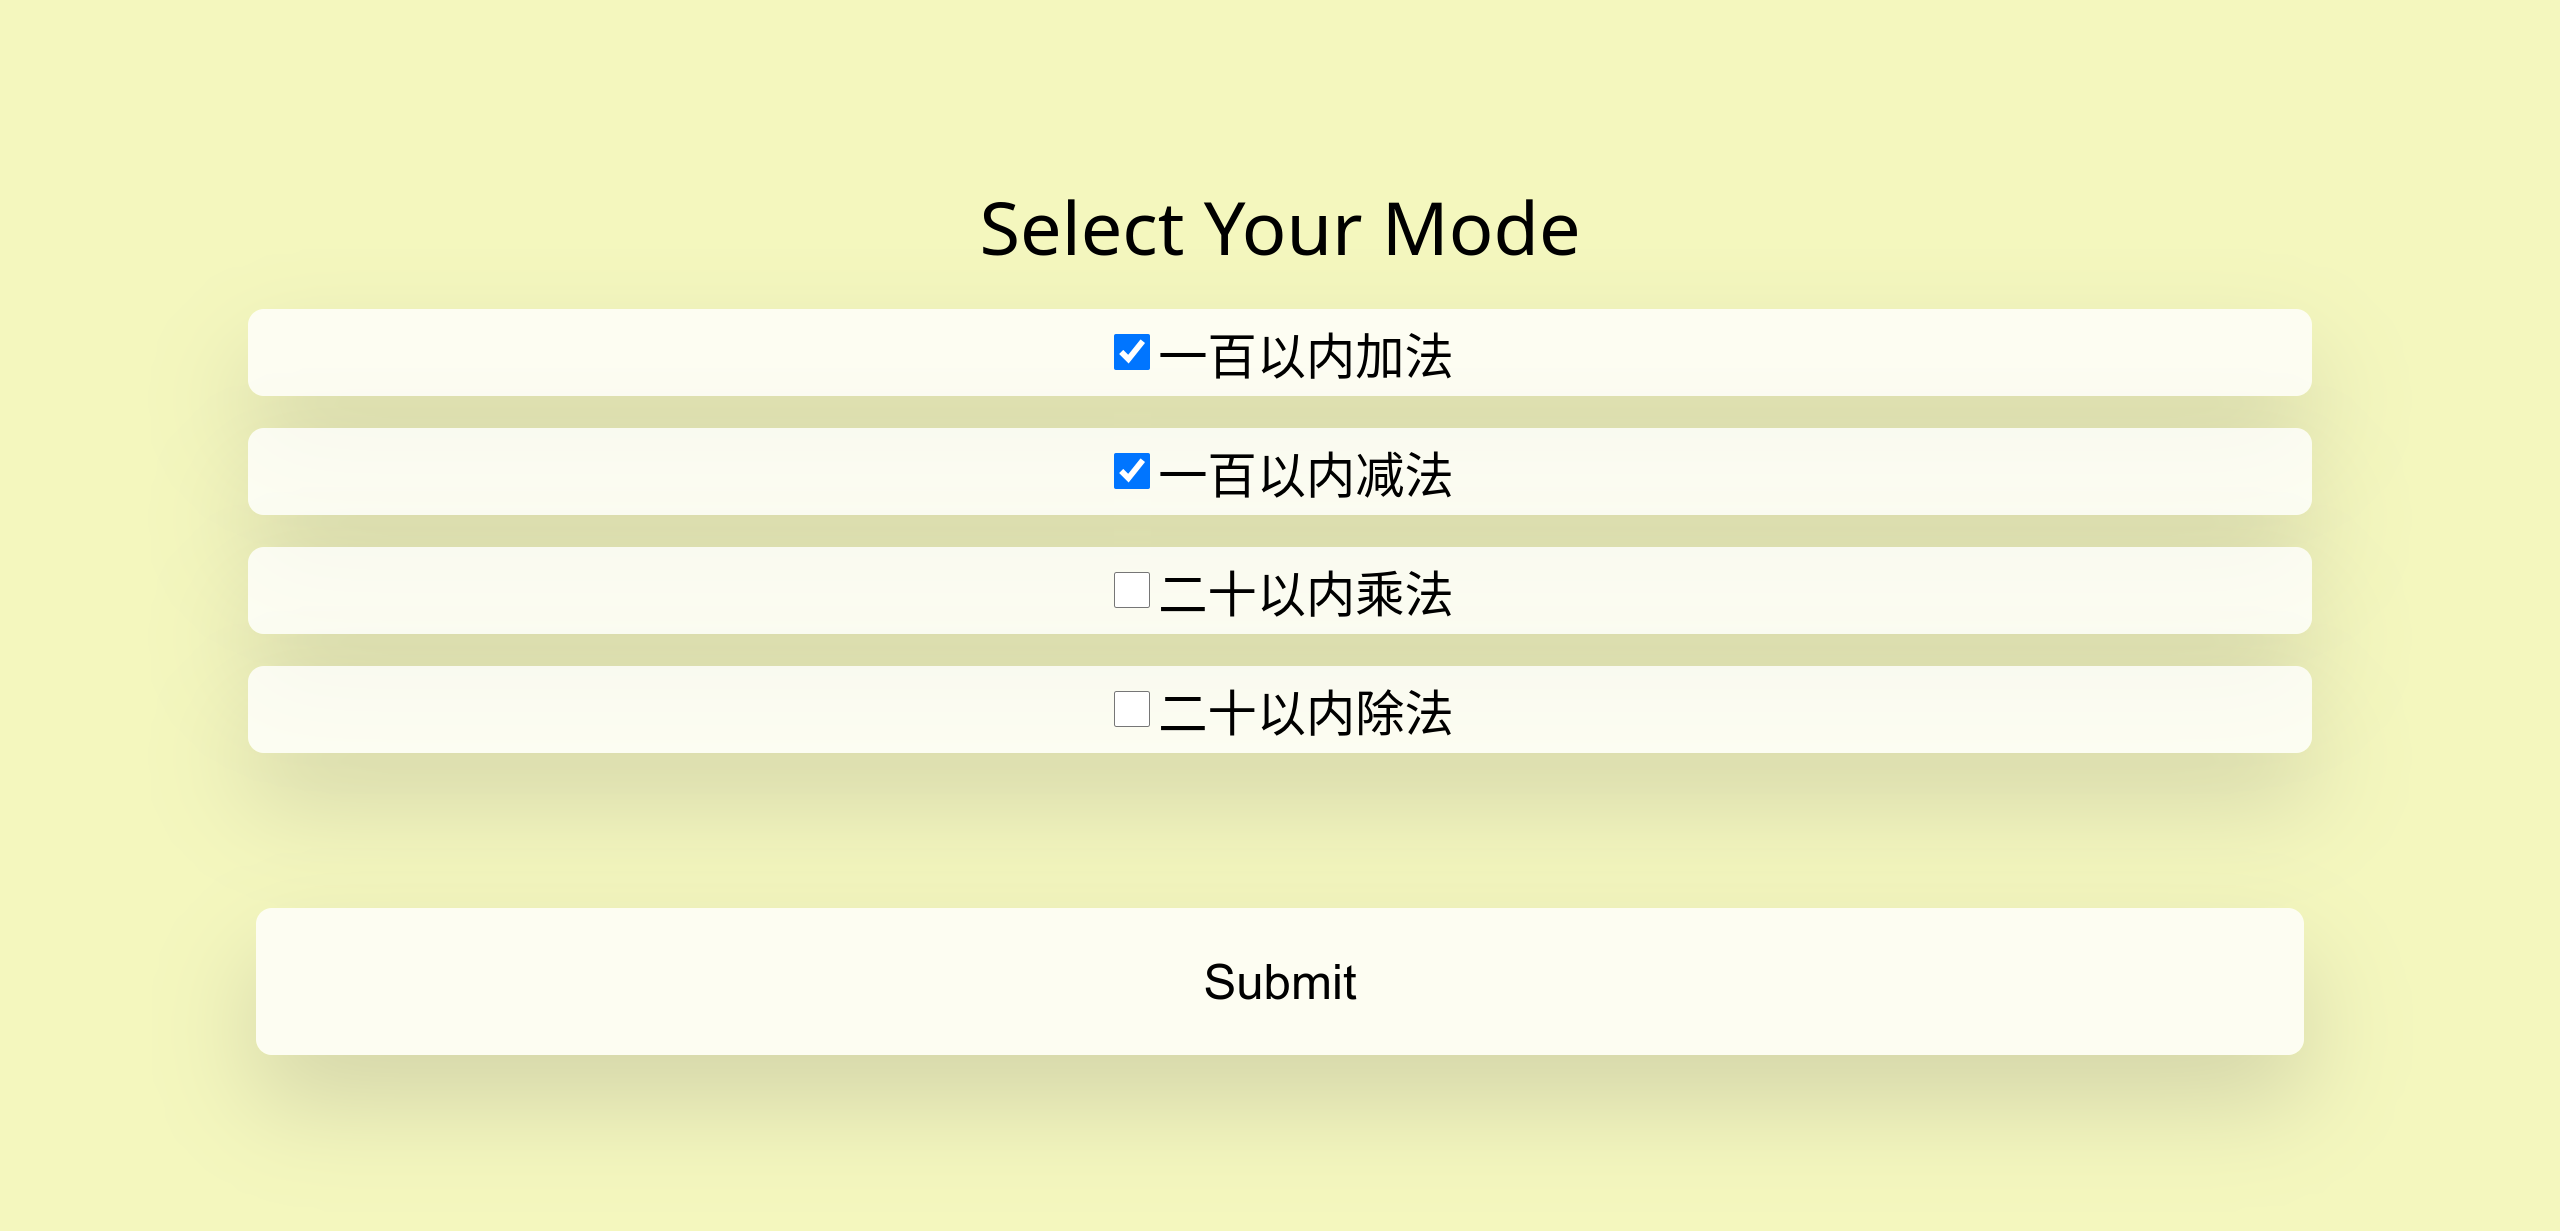
小学数学训练的项目暂且搁置了,等我神功小成再回来重构吧……
这几天可能学习一下 vue 和 tailwind css(或者 bootstrap?)
Intermedaite HTML and CSS
Position
-
relative,相对于原本位置的 position。通过定义 left/right/top/bottom 来确定相对位置。注意这里定义的是偏移量,即相对于其原本应在的位置的偏移。
-
absolute,绝对位置,相对于 parent 的 position,通过定义 left/right/top/bottom 来确定其位置。
- note: 这里的 parent 是祖先中第一个 position 为 relative 或 absolute 的,因此使用时一般设置 parent container 的 position 为 relative.
-
fixed,固定于屏幕上某个位置,不会随着翻页而改变。
-
sticky,经常在导航栏上使用的东西。
一个基础的 Form:
 1
 2
 3
 4
 5
 6
 7
 8
 9
10
11
12
13
14
15
16
17
18
|
<form action="http://httpbin.org/post" method="post">
  <div>
    <label for="first_name">First Name:</label>
    <input type="text" name="first_name" id="first_name">
  </div>

  <div>
    <label for="last_name">Last Name:</label>
    <input type="text" name="last_name" id="last_name">
  </div>

  <div>
    <label for="age">Age:</label>
    <input type="number" name="age" id="age">
  </div>

  <button type="submit">Submit</button>
</form>
|
name 是传参的名字,id 跟其他 html element 中是一个意义的。
1
2
3
|
<textarea></textarea>

<textarea rows="20" cols="60"></textarea>
|
textarea 是可缩放的多行编辑框,用 rows 和 cols 来定义初始大小。
1
2
3
4
5
6
7
8
|
<select name="Car">
  <option value="mercedes">Mercedes</option>
  <option value="tesla">Tesla</option>
  <option value="volvo">Volvo</option>
  <option value="bmw">BMW</option>
  <option value="mini">Mini</option>
  <option value="ford">Ford</option>
</select>
|
select 是下拉选项,value 是传参时的值。
1
|
<option value="volvo" selected>Volvo</option>
|
可以设置默认选项。
可以分组。
 1
 2
 3
 4
 5
 6
 7
 8
 9
10
11
12
|
<select name="fashion">
  <optgroup label="Clothing">
    <option value="t_shirt">T-Shirts</option>
    <option value="sweater">Sweaters</option>
    <option value="coats">Coats</option>
  </optgroup>
  <optgroup label="Foot Wear">
    <option value="sneakers">Sneakers</option>
    <option value="boots">Boots</option>
    <option value="sandals">Sandals</option>
  </optgroup>
</select>
|
Radio Button 是列表单选项,通过 name 来判定为同一组。同组中只能选一个。
 1
 2
 3
 4
 5
 6
 7
 8
 9
10
11
12
13
14
15
|
<h1>Ticket Type</h1>
<div>
  <input type="radio" id="child" name="ticket_type" value="child">
  <label for="child">Child</label>
</div>

<div>
  <input type="radio" id="adult" name="ticket_type" value="adult">
  <label for="adult">Adult</label>
</div>

<div>
  <input type="radio" id="senior" name="ticket_type" value="senior">
  <label for="senior">Senior</label>
</div>
|
用 checked 来默认选中。
1
|
<input type="radio" id="adult" name="ticket_type" value="adult" checked>
|
Checkbox,多选。
 1
 2
 3
 4
 5
 6
 7
 8
 9
10
11
12
13
14
15
16
17
18
19
|
<div>
  <input type="checkbox" id="sausage" name="topping" value="sausage">
  <label for="sausage">Sausage</label>
</div>

<div>
  <input type="checkbox" id="onions" name="topping" value="onions">
  <label for="onions">Onions</label>
</div>

<div>
  <input type="checkbox" id="pepperoni" name="topping" value="pepperoni">
  <label for="pepperoni">Pepperoni</label>
</div>

<div>
  <input type="checkbox" id="mushrooms" name="topping" value="mushrooms">
  <label for="mushrooms">Mushrooms</label>
</div>
|
Button 就更常用了。可以在 form 中定义 submit 类型的 button,一键提交。
还有 reset,回归默认。
如果想要朴素的 button,那得手动设定 type.
form 中 button 的 type 默认是 submit,这个需要注意。
1
2
3
|
<button type="submit">Submit</button>
<button type="reset">Reset</button>
<button type="button">Click to Toggle</button>
|
fieldset 可以给 field 分组。
1
2
3
4
5
6
7
|
<fieldset>
  <label for="first_name">First Name</label>
  <input type="text" id="first_name" name="first_name">

  <label for="last_name">Last Name</label>
  <input type="text" id="last_name" name="last_name">
</fieldset>
|
在 fieldset 后面添加 legend 可以加一个小标题。
1
2
3
|
<fieldset>
  <legend>Contact Details</legend>
  ...
|
给 form control 添加 required attribute,表示必填。
1
2
3
4
|
  <div>
    <label for="user_email">*Email:</label>
    <input type="email" id="user_email" name="user_email" required>
  </div>
|
可以给 input 设置 minlength maxlength,给 type 为 number 的 input 设置 min/max 上下界,可以设置 pattern attribute 检验输入是否符合某个正则串。
过了 validation 的 control 会有一个 valid state,没过的对应 invalid.
1
2
3
4
5
6
7
|
input:invalid {
  border-color: red;
}

input:valid {
  border-color: green;
}
|
在前端检验完了,后端也依然要继续检验数据合法性,不然被抓包塞脏数据就不好了(
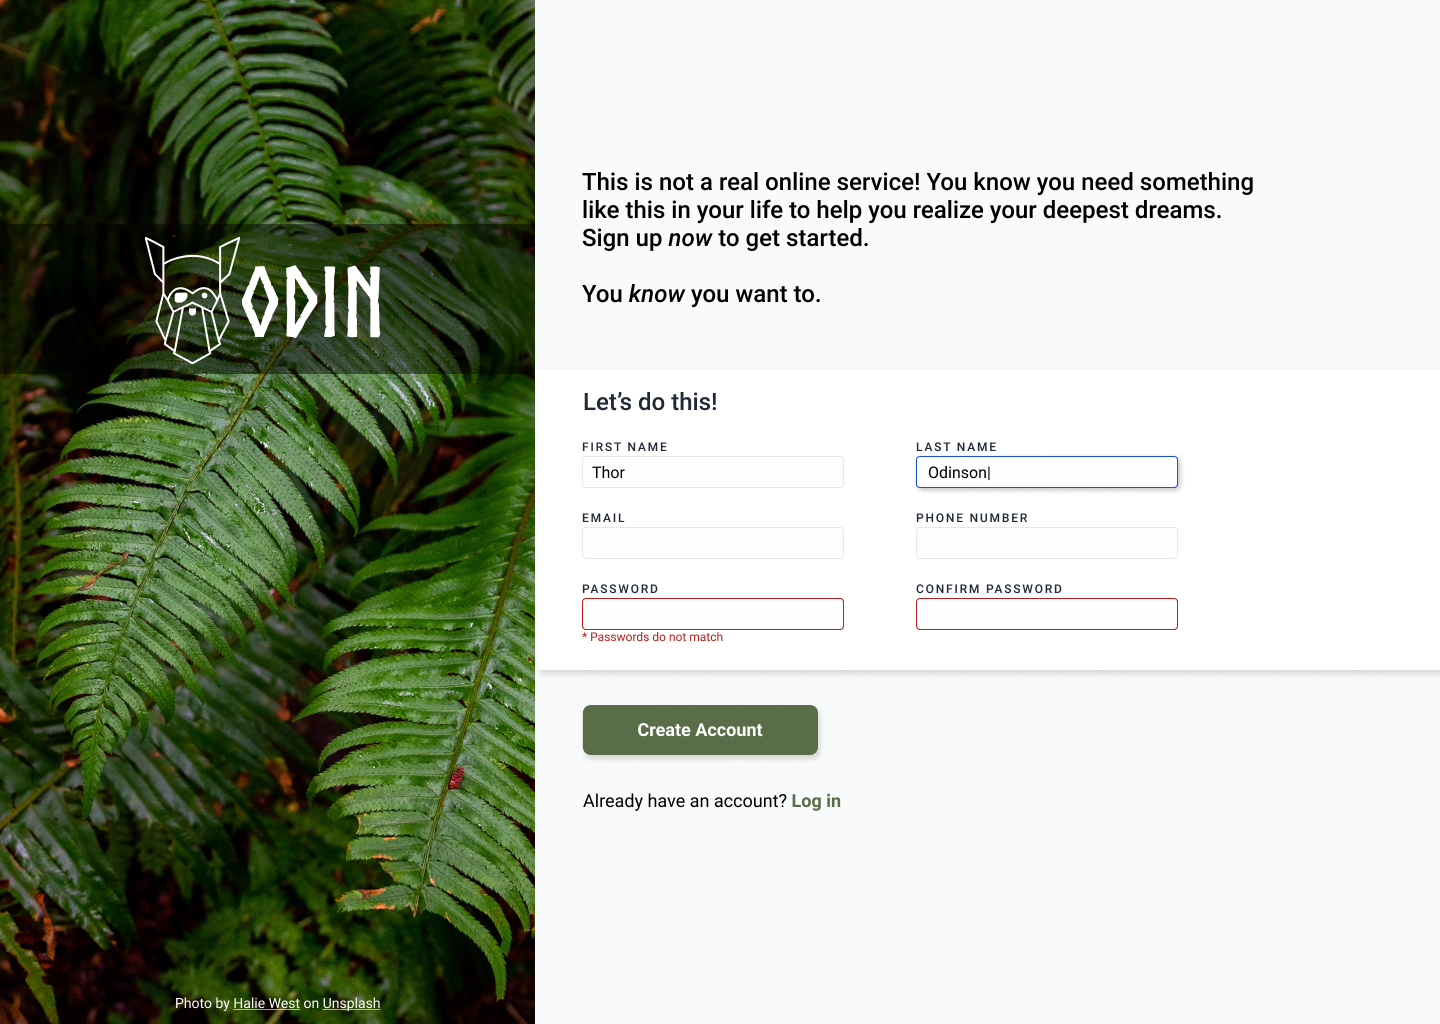
乍一看,还挺好看的……这一节的 Assignment 就是仿制一个这东西。
横向划分为两个部分,右侧划分为三个部分。
那个鬼畜的 ODIN logo 用 position 解决。
字体懒得设置了,看起来差不太多就行。
总感觉有点不对劲、、、
  1
  2
  3
  4
  5
  6
  7
  8
  9
 10
 11
 12
 13
 14
 15
 16
 17
 18
 19
 20
 21
 22
 23
 24
 25
 26
 27
 28
 29
 30
 31
 32
 33
 34
 35
 36
 37
 38
 39
 40
 41
 42
 43
 44
 45
 46
 47
 48
 49
 50
 51
 52
 53
 54
 55
 56
 57
 58
 59
 60
 61
 62
 63
 64
 65
 66
 67
 68
 69
 70
 71
 72
 73
 74
 75
 76
 77
 78
 79
 80
 81
 82
 83
 84
 85
 86
 87
 88
 89
 90
 91
 92
 93
 94
 95
 96
 97
 98
 99
100
101
102
103
104
105
106
107
108
109
110
111
112
113
114
115
116
117
118
119
120
121
122
123
124
125
126
127
128
129
130
131
132
133
134
135
136
137
138
139
140
141
142
143
144
145
146
147
148
149
150
151
152
153
154
155
156
157
158
159
160
161
162
163
164
165
166
167
168
169
170
171
172
173
174
175
176
177
178
179
180
181
182
183
184
185
186
187
188
189
190
191
192
|
<!DOCTYPE html>
<html lang="en">

<head>
    <meta charset="UTF-8">
    <meta http-equiv="X-UA-Compatible" content="IE=edge">
    <meta name="viewport" content="width=device-width, initial-scale=1.0">
    <title>Sign Up</title>
    <style>
        body {
            display: flex;
            height: 100vh;
            margin: 0;
            padding: 0;
        }

        div#left {
            position: relative;
            height: 100%;
            width: 35vw;
            background-color: black;
            background-image: url("https://images.unsplash.com/photo-1585202900225-6d3ac20a6962?ixlib=rb-1.2.1&ixid=MnwxMjA3fDB8MHxwaG90by1wYWdlfHx8fGVufDB8fHx8&auto=format&fit=crop&w=687&q=80");
            background-size: cover;
            background-position: center;
        }

        div#logo {
            position: absolute;
            top: 22%;
            background-color: rgba(0, 0, 0, 0.6);
            height: 15%;
            width: 100%;
            display: flex;
            justify-content: center;
            align-items: center;
        }

        div#logo div {
            font-family: 'Times New Roman', Times, serif;
            opacity: 80%;
            font-size: 15vh;
            color: aliceblue;
        }

        div#right {
            flex: 1 1 auto;
            background-color: whitesmoke;
            display: flex;
            flex-direction: column;
            justify-content: center;
        }

        div#right>#one {
            display: flex;
            align-items: flex-end;
            height: 25vh;
            position: relative;
        }

        div#right>#one>#intro {
            position: absolute;
            left: 2vw;
            bottom: 3vh;
            font-size: 1.2vw;
            font-weight: 500;
            width: 80%;
        }

        div#right>#two {
            height: 40vh;
            background-color: white;
            border: 1px solid antiquewhite;
            box-shadow: rgba(0, 0, 0, 0.35) 0px 5px 15px;
            padding: 2vh 2vw;
        }

        .main {
            width: 50vw;
            display: grid;
            grid-template-columns: auto auto;
            grid-template-rows: auto auto auto auto;
            column-gap: 2vw;
        }

        h2 {
            font-size: 2vw;
        }

        label {
            font-size: 1.2vw;
            color: rgb(50,50,50);
        }

        input {
            height: 2.5vh;
            border: 1px solid rgb(240,240,240);
            box-shadow: rgba(0, 0, 0, 0.16) 0px 1px 2px, rgba(0, 0, 0, 0.23) 0px 1px 2px;
            font-size: 1vw;
        }

        input:focus{
            outline: 3px dashed skyblue;
            box-shadow: none;
        }

        .field {
            display: flex;
            flex-direction: column;
            width: 16vw;
            height: 8vh;
        }

        div#right>#three {
            height: 25vh;
            padding: 3vh 2vw;
        }

        button {
            width: 14vw;
            height: 6vh;
            background-color:darkolivegreen;
            box-shadow: rgba(14, 30, 37, 0.12) 0px 2px 4px 0px, rgba(14, 30, 37, 0.32) 0px 2px 16px 0px;
            border: 0;
            border-radius: 0.5vw;
            color:ivory;
            font-size: 1.5vw;
        }

        div#right>#three>p {
            font-size: 1.1vw;
            margin-top: 3vh;
        }

        div#right>#three>p>a {
            color:darkolivegreen;
            font-weight:700;
        }

    </style>
</head>

<body>
    <div id="left">
        <div id="logo">
            <div>ODIN</div>
        </div>
    </div>
    <div id="right">
        <div id="one">
            <div id="intro">
                <p>This is not a real online service! You know you need something like this in your life to help you
                    realize your deepest dreams. <br> Sign up <em> now </em> to get started.</p>
                <p>You <em> know </em>you want to.</p>
            </div>
        </div>
        <div id="two">
            <h2>Let's do this!</h2>
            <form class="main" id="myForm">
                <div class="field">
                    <label for="firstName">FIRST NAME</label>
                    <input type="text" name="firstName" required></input>
                </div>
                <div class="field">
                    <label for="lastName">LAST NAME</label>
                    <input type="text" name="lastName" required></input>
                </div>
                <div class="field">
                    <label for="email">EMAIL</label>
                    <input type="email" name="email" required></input>
                </div>
                <div class="field">
                    <label for="phone">PHONE NUMBER</label>
                    <input type="number" name="phoneNumber" required></input>
                </div>
                <div class="field">
                    <label for="password">PASSWORD</label>
                    <input type="password" name="password" required></input>
                </div>
                <div class="field">
                    <label for="password">CONFIRM PASSWORD</label>
                    <input type="password" name="password" required></input>
                </div>
            </form>
        </div>
        <div id="three">
            <button form="myForm" type="submit">Create Account</button>
            <p>Already have an account? <a>Log in</a></p>
        </div>
    </div>
</body>

</html>
|
还有一个 Grid 相关的 project,既然我已经做过了 numpad,那就不做这个了……
Intermediate HTML and CSS 这个 Course 就到此结束了。
Javascript
在 js 中,property 可以用两种方式访问:
1
2
|
obj.property
obj["property"]
|
后者的好处是可以处理带空格的 property name(不会真的有人起这样的名字吧、、)
object constructor 可以这么写:
 1
 2
 3
 4
 5
 6
 7
 8
 9
10
11
12
|
function Player(name, marker) {
  this.name = name
  this.marker = marker
  this.sayName = function() {
    console.log(name)
  }
}

const player1 = new Player('steve', 'X')
const player2 = new Player('also steve', 'O')
player1.sayName() // logs 'steve'
player2.sayName() // logs 'also steve'
|
后面又引入了一个 prototype 的概念。
 1
 2
 3
 4
 5
 6
 7
 8
 9
10
11
12
13
14
15
16
17
|
function Student() {
}

Student.prototype.sayName = function() {
  console.log(this.name)
}

function EighthGrader(name) {
  this.name = name
  this.grade = 8
}

EighthGrader.prototype = Object.create(Student.prototype)

const carl = new EighthGrader("carl")
carl.sayName() // console.logs "carl"
carl.grade // 8
|
应该说所有的 instance 会共用一个 prototype. 那么在 prototype 上挂载函数,就可以避免每次 new instance 的时候现场创建,降低一些开销。
此外,还可以在 prototype 上挂些变量,读的时候会读到 prototype 上,但写了之后就在当前 obj 上声明了新变量,从而覆写 prototype 上的变量。
在寻找 property 时,obj 与其 prototype 及其各路祖先构成了一条 prototype chain,从这个链一路向上查找对应的 property. 跟继承有些类似。
似乎有建议说尽量写 factory function 而不要用 constructor 生成 obj.
 1
 2
 3
 4
 5
 6
 7
 8
 9
10
|
const personFactory = (name, age) => {
  const sayHello = () => console.log('hello!');
  return { name, age, sayHello };
};

const jeff = personFactory('jeff', 27);

console.log(jeff.name); // 'jeff'

jeff.sayHello(); // calls the function and logs 'hello!'
|
在 factory function 中可以写出类似继承的效果。
 1
 2
 3
 4
 5
 6
 7
 8
 9
10
11
12
13
14
15
16
|
const Person = (name) => {
  const sayName = () => console.log(`my name is ${name}`);
  return {sayName};
}

const Nerd = (name) => {
  // simply create a person and pull out the sayName function with destructuring assignment syntax!
  const {sayName} = Person(name);
  const doSomethingNerdy = () => console.log('nerd stuff');
  return {sayName, doSomethingNerdy};
}

const jeff = Nerd('jeff');

jeff.sayName(); //my name is jeff
jeff.doSomethingNerdy(); // nerd stuff
|
也可以靠 prototype 直接继承。
1
2
3
4
5
|
const Nerd = (name) => {
  const prototype = Person(name);
  const doSomethingNerdy = () => console.log('nerd stuff');
  return Object.assign({}, prototype, {doSomethingNerdy});
}
|
getter 和 setter:
 1
 2
 3
 4
 5
 6
 7
 8
 9
10
11
12
13
14
15
16
17
18
|
let user = {
  name: "John",
  surname: "Smith",

  get fullName() {
    return `${this.name} ${this.surname}`;
  },

  set fullName(value) {
    [this.name, this.surname] = value.split(" ");
  }
};

// set fullName is executed with the given value.
user.fullName = "Alice Cooper";

alert(user.name); // Alice
alert(user.surname); // Cooper
|
也可以用 defineProperty 来定义 accesssor.
1
2
3
4
5
6
7
8
9
|
Object.defineProperty(user, 'fullName', {
  get() {
    return `${this.name} ${this.surname}`;
  },

  set(value) {
    [this.name, this.surname] = value.split(" ");
  }
});
|
有的时候,class method 会出现 losing this 的情况。这往往是在将 method 作为 function 传参后出现的问题。
 1
 2
 3
 4
 5
 6
 7
 8
 9
10
11
12
13
|
class Button {
  constructor(value) {
    this.value = value;
  }

  click() {
    alert(this.value);
  }
}

let button = new Button("hello");

setTimeout(button.click, 1000); // undefined
|
解决方案是套一层皮。
1
|
setTimeout(() => button.click(), 1000)
|
可以直接 bind function
 1
 2
 3
 4
 5
 6
 7
 8
 9
10
|
let user = {
  firstName: "John"
};

function func() {
  alert(this.firstName);
}

let funcUser = func.bind(user);
funcUser(); // John
|
还有一个 class specific 的优雅方法,在 new obj 的时候新建一个 closure.
1
2
3
4
5
6
7
8
|
class Button {
  constructor(value) {
    this.value = value;
  }
  click = () => {
    alert(this.value);
  }
}
|
1
2
3
4
5
6
7
8
9
|
class User {

  ['say' + 'Hi']() {
    alert("Hello");
  }

}

new User().sayHi();
|
用 extends 来继承,只能拥有唯一的 parent.
 1
 2
 3
 4
 5
 6
 7
 8
 9
10
11
12
13
14
15
16
17
18
19
20
21
22
|
class Animal {
  constructor(name) {
    this.name = name;
  }

  speak() {
    console.log(`${this.name} makes a noise.`);
  }
}

class Dog extends Animal {
  constructor(name) {
    super(name); // call the super class constructor and pass in the name parameter
  }

  speak() {
    console.log(`${this.name} barks.`);
  }
}

const d = new Dog('Mitzie');
d.speak(); // Mitzie barks.
|
可以用一些奇技淫巧来实现类似于继承多个 interface 的功能。
1
2
3
4
5
6
7
8
9
|
const calculatorMixin = (Base) => class extends Base {
  calc() { }
};

const randomizerMixin = (Base) => class extends Base {
  randomize() { }
};
class Foo { }
class Bar extends calculatorMixin(randomizerMixin(Foo)) { }
|
Day1
Async
异步。js 和 backend 的交互需要用到。
一个比较传统的异步写法是利用 callback,比如执行完 IO 操作后执行传入的函数来传递结果。
 1
 2
 3
 4
 5
 6
 7
 8
 9
10
|
function myDisplayer(some) {
  document.getElementById("demo").innerHTML = some;
}

function myCalculator(num1, num2, myCallback) {
  let sum = num1 + num2;
  myCallback(sum);
}

myCalculator(5, 5, myDisplayer);
|
setTimeout 可以在超时时执行对应的 callback,setInterval 可以定期执行。
 1
 2
 3
 4
 5
 6
 7
 8
 9
10
11
12
13
14
15
16
|
setTimeout(myFunction, 3000);

function myFunction() {
  document.getElementById("demo").innerHTML = "I love You !!";
}


setInterval(myFunction, 1000);

function myFunction() {
  let d = new Date();
  document.getElementById("demo").innerHTML=
  d.getHours() + ":" +
  d.getMinutes() + ":" +
  d.getSeconds();
}
|
举一个 irl 的例子,File IO:
 1
 2
 3
 4
 5
 6
 7
 8
 9
10
11
12
13
14
15
16
17
18
|
function myDisplayer(some) {
  document.getElementById("demo").innerHTML = some;
}

function getFile(myCallback) {
  let req = new XMLHttpRequest();
  req.open('GET', "mycar.html");
  req.onload = function() {
    if (req.status == 200) {
      myCallback(this.responseText);
    } else {
      myCallback("Error: " + req.status);
    }
  }
  req.send();
}

getFile(myDisplayer);
|
这里利用了 eventListener,设置 onload event 的 callback.
更 modern 的写法是 promise,有点 functional programming 的味道。
- Producing Code,消耗时间的操作。
- Consuming Code,需要依赖结果的操作。
js 中的 Promise 连接了 Producing Code 与 Consuming Code.
Promise 的 state 可以为:pending/fulfilled/rejected.
pending state 下,promise.result 为 undefined. fulfilled 则为 result value,rejected 则为 error object.
1
2
3
4
5
6
7
8
9
|
function successCallback(result) {
  console.log(`Audio file ready at URL: ${result}`);
}

function failureCallback(error) {
  console.error(`Error generating audio file: ${error}`);
}

createAudioFileAsync(audioSettings).then(successCallback, failureCallback);
|
用 promise 的好处是可以比较方便地组合。
 1
 2
 3
 4
 5
 6
 7
 8
 9
10
11
12
13
14
15
|
doSomething(function (result) {
  doSomethingElse(result, function (newResult) {
    doThirdThing(newResult, function (finalResult) {
      console.log(`Got the final result: ${finalResult}`);
    }, failureCallback);
  }, failureCallback);
}, failureCallback);

doSomething()
  .then((result) => doSomethingElse(result))
  .then((newResult) => doThirdThing(newResult))
  .then((finalResult) => {
    console.log(`Got the final result: ${finalResult}`);
  })
  .catch(failureCallback);
|
比较传统的 callback 写法与 promise 写法,FP 竟恐怖如斯。
还有我们熟悉的 async/await.
1
2
3
4
5
6
|
async function myFunction() {
  return "Hello";
}
myFunction().then(
  function(value) {myDisplayer(value);}
);
|
1
2
3
4
5
6
7
8
|
async function myDisplay() {
  let myPromise = new Promise(function(resolve, reject) {
    resolve("I love You !!");
  });
  document.getElementById("demo").innerHTML = await myPromise;
}

myDisplay();
|
一个 irl 的例子:
 1
 2
 3
 4
 5
 6
 7
 8
 9
10
11
12
13
14
15
16
17
|
async function getFile() {
  let myPromise = new Promise(function(resolve) {
    let req = new XMLHttpRequest();
    req.open('GET', "mycar.html");
    req.onload = function() {
      if (req.status == 200) {
        resolve(req.response);
      } else {
        resolve("File not Found");
      }
    };
    req.send();
  });
  document.getElementById("demo").innerHTML = await myPromise;
}

getFile();
|
这样说来,应该有三种常用的异步模式:callback,promise,async/await.
API
接下来就学习调用 Web API 了。
当今时代,应当使用 fetch.
1
2
3
4
5
6
7
8
|
// URL (required), options (optional)
fetch('https://url.com/some/url')
  .then(function(response) {
    // Successful response :)
  })
  .catch(function(err) {
    // Error :(
  });
|
默认情况下,浏览器不允许本站对其他站的 http 请求。设置 Cross Origin Resource Sharing (CORS) 的模式就可以解决这个问题。
1
2
3
|
fetch('url.url.com/api', {
  mode: 'cors'
});
|
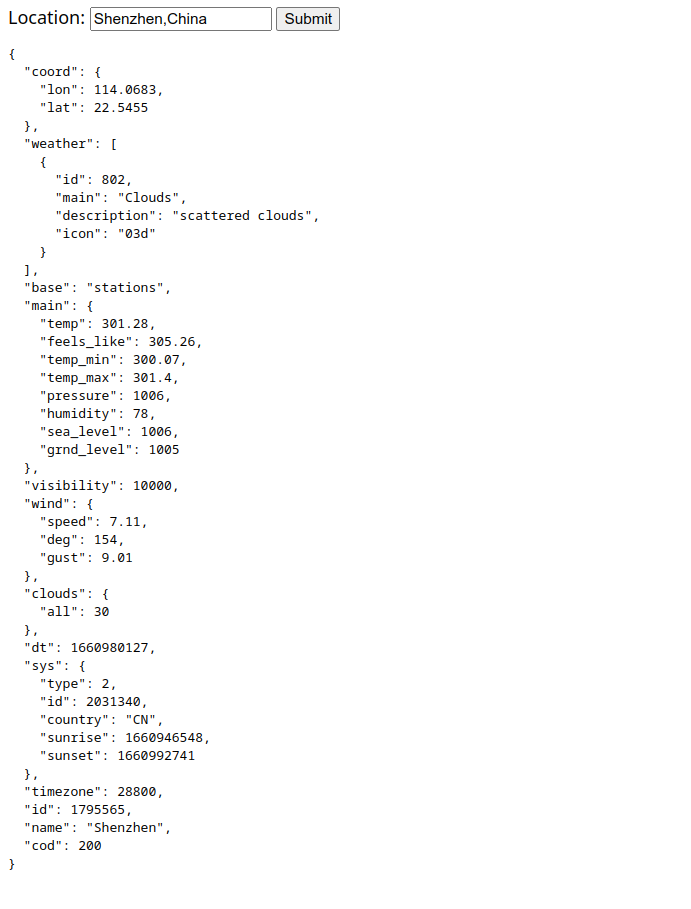
Project Weather APP
调用 API 写一个天气预报的页面。
刚刚突然下雨把晒的被子淋湿了,有点应景、、、
首先找一个 API,这里选用 openweathermap.
申请了一个 API key,用 get 调用 API 就可以了,感觉还比较简单。
具体的显示懒得搞了,就这样吧。。。
接下来有一个 Unit Test 的 Course Section,教的是 Jest. 暂且不学,要用再说。
然后学 React.
不过我打算学 Vue.
把 Vue 的 Interactive Tutorial 过了一遍。
Vue Application 从 root component 起始。
1
2
3
4
5
|
import { createApp } from 'vue'

const app = createApp({
  /* root component options */
})
|
application instance 要 mount 后才会渲染。
1
2
3
4
|
<div id="app"></div>
<script>
app.mount('#app')
</script>
|
vue template 是 vue 自行拓展的一套东西,在编译期会转为 pure HTML+JS.
Text interpolation,用双括号。
1
|
<span>Message: {{ msg }}</span>
|
这个叫做 mustache tag,里面默认是文本。如果想要植入 html,需要设置 v-html.
1
2
|
<p>Using text interpolation: {{ rawHtml }}</p>
<p>Using v-html directive: <span v-html="rawHtml"></span></p>
|
这里的 v-html 被称为 directive. Directive 以 v- 开头,是 vue 特有的 attribute.
mustache 无法用在 attribute 中,也就是说,你没法写这样的 code:
1
|
<div id="{{ myId }}"> </div> <!-- Wrong! -->
|
相应的,应当使用 v-bind directive.
1
|
<div v-bind:id="myId"> </div>
|
这样就将 html attribute 与动态计算的 vue property 建立联系。
还有一个 shorthand:
1
|
<div> :id="myId"> </div>
|
还可以一次 bind 多个 attributes.
 1
 2
 3
 4
 5
 6
 7
 8
 9
10
11
|
<script>
data() {
  return {
    objectOfAttrs: {
      id: 'container',
      class: 'wrapper'
    }
  }
}
</script>
<div v-bind="objectOfAttrs"></div>
|
可以写 js expression,但只能是单条 expression.
1
2
3
4
5
6
7
|
{{ number + 1 }}

{{ ok ? 'YES' : 'NO' }}

{{ message.split('').reverse().join('') }}

<div :id="`list-${id}`"></div>
|
template expression 只能访问一部分的全局变量。
v-if 可以判断布尔值来决定是否显示某个 element.
1
|
<p v-if="seen">Now you see me</p>
|
directive 中的 argument name 也可以是 js expression,用方括号括起来。
1
2
3
4
|
<a v-bind:[attributeName]="url"> ... </a>

<!-- shorthand -->
<a :[attributeName]="url"> ... </a>
|
v-on 绑定事件。
1
2
3
4
|
<a v-on:[eventName]="doSomething"> ... </a>

<!-- shorthand -->
<a @[eventName]="doSomething">
|

在 Options API 中,使用 data 来定义组件的响应式状态(reactive state).
 1
 2
 3
 4
 5
 6
 7
 8
 9
10
11
12
13
14
15
16
|
export default {
  data() {
    return {
      count: 1
    }
  },

  // `mounted` is a lifecycle hook which we will explain later
  mounted() {
    // `this` refers to the component instance.
    console.log(this.count) // => 1

    // data can be mutated as well
    this.count = 2
  }
}
|
必须在 data 中明确定义需要用到的 state. 可以用 null 来做 placeholder.
可以添加 methods,会自动绑定到 this 上。
 1
 2
 3
 4
 5
 6
 7
 8
 9
10
11
12
13
14
15
16
|
export default {
  data() {
    return {
      count: 0
    }
  },
  methods: {
    increment() {
      this.count++
    }
  },
  mounted() {
    // methods can be called in lifecycle hooks, or other methods!
    this.increment()
  }
}
|
需要注意保证 this 有效,比如下面这种写法就不太行。
1
2
3
4
5
6
7
|
export default {
  methods: {
    increment: () => {
      // BAD: no `this` access here!
    }
  }
}
|
更改 reactive state 后,DOM 将自动更新,但并非实时更新,而是缓存起来,在一个 tick 结束后一次性更新。
可以用 nextTick(callback) 来在下一个 tick 执行函数,访问已更新的 DOM.
 1
 2
 3
 4
 5
 6
 7
 8
 9
10
11
12
|
import { nextTick } from 'vue'

export default {
  methods: {
    increment() {
      this.count++
      nextTick(() => {
        // access updated DOM
      })
    }
  }
}
|
computed property 可以根据 data 中的 reactive state 自动计算得出相应的 computed property.
 1
 2
 3
 4
 5
 6
 7
 8
 9
10
11
12
13
14
15
16
17
18
19
20
21
|
export default {
  data() {
    return {
      author: {
        name: 'John Doe',
        books: [
          'Vue 2 - Advanced Guide',
          'Vue 3 - Basic Guide',
          'Vue 4 - The Mystery'
        ]
      }
    }
  },
  computed: {
    // a computed getter
    publishedBooksMessage() {
      // `this` points to the component instance
      return this.author.books.length > 0 ? 'Yes' : 'No'
    }
  }
}
|
这个貌似还挺智能的,在所依赖的 reactive state 变更的时候才会进行计算。
computed property 默认是 readonly 的,但可以手动设置 setter.
 1
 2
 3
 4
 5
 6
 7
 8
 9
10
11
12
13
14
15
16
17
18
19
20
21
|
export default {
  data() {
    return {
      firstName: 'John',
      lastName: 'Doe'
    }
  },
  computed: {
    fullName: {
      // getter
      get() {
        return this.firstName + ' ' + this.lastName
      },
      // setter
      set(newValue) {
        // Note: we are using destructuring assignment syntax here.
        [this.firstName, this.lastName] = newValue.split(' ')
      }
    }
  }
}
|
但一般来说,避免直接修改 computed property,而应当更新其对应的 reactive state.
可以用 v-bind 来动态指定 class.
1
2
3
4
|
<div
  class="static"
  :class="{ active: isActive, 'text-danger': hasError }"
></div>
|
当然也可以用一整个 object.
 1
 2
 3
 4
 5
 6
 7
 8
 9
10
11
|
<script>
data() {
  return {
    classObject: {
      active: true,
      'text-danger': false
    }
  }
}
</script>
<div :class="classObject"></div>
|
数组也可以:
1
|
<div :class="[activeClass, errorClass]"></div>
|
数组中混合:
1
|
<div :class="[{ active: isActive }, errorClass]"></div>
|
Day2
昨天划水过多,进度严重拖慢了,糟糕。
v-if v-else-if v-else
 1
 2
 3
 4
 5
 6
 7
 8
 9
10
11
12
|
<div v-if="type === 'A'">
  A
</div>
<div v-else-if="type === 'B'">
  B
</div>
<div v-else-if="type === 'C'">
  C
</div>
<div v-else>
  Not A/B/C
</div>
|
可以在 template 上直接打 v-if.
1
2
3
4
5
|
<template v-if="ok">
  <h1>Title</h1>
  <p>Paragraph 1</p>
  <p>Paragraph 2</p>
</template>
|
还有一个 v-show.
1
|
<h1 v-show="ok">Hello!</h1>
|
不同于 v-if,v-show 仅仅只切换了 element 的 display attr.
v-for 可以用于显示数组。
 1
 2
 3
 4
 5
 6
 7
 8
 9
10
|
<script>
data() {
  return {
    items: [{ message: 'Foo' }, { message: 'Bar' }]
  }
}
</script>
<li v-for="item in items">
  {{ item.message }}
</li>
|
遍历时也可以带上下标。
1
2
3
|
<li v-for="(item, index) in items">
  {{ parentMessage }} - {{ index }} - {{ item.message }}
</li>
|
可以嵌套,也可以用 for of.
1
|
<div v-for="item of items"></div>
|
obj 也可以 for,遍历 key value.
1
2
3
|
<li v-for="(value, key) in myObject">
  {{ key }}: {{ value }}
</li>
|
也可以加上 index.
1
2
3
|
<li v-for="(value, key, index) in myObject">
  {{ index }}. {{ key }}: {{ value }}
</li>
|
v-for 可以用在 template 上。
1
2
3
4
5
6
|
<ul>
  <template v-for="item in items">
    <li>{{ item.msg }}</li>
    <li class="divider" role="presentation"></li>
  </template>
</ul>
|
v-for 是保留顺序的,在更改 reactive state 之后,可以动态调整顺序。但需要手动指定一个 key.
1
2
3
|
<div v-for="item in items" :key="item.id">
  <!-- content -->
</div>
|
v-on 可以用 $event 来传递 event obj.
1
2
3
4
5
6
7
8
9
|
<!-- using $event special variable -->
<button @click="warn('Form cannot be submitted yet.', $event)">
  Submit
</button>

<!-- using inline arrow function -->
<button @click="(event) => warn('Form cannot be submitted yet.', event)">
  Submit
</button>
|
可以添加一些 modifier.
 1
 2
 3
 4
 5
 6
 7
 8
 9
10
11
|
<!-- use capture mode when adding the event listener -->
<!-- i.e. an event targeting an inner element is handled here before being handled by that element -->
<div @click.capture="doThis">...</div>

<!-- the click event will be triggered at most once -->
<a @click.once="doThis"></a>

<!-- the scroll event's default behavior (scrolling) will happen -->
<!-- immediately, instead of waiting for `onScroll` to complete  -->
<!-- in case it contains `event.preventDefault()`                -->
<div @scroll.passive="onScroll">...</div>
|
key 相关的事件还可以按 keycode 过滤。
1
2
3
4
|
<!-- only call `vm.submit()` when the `key` is `Enter` -->
<input @keyup.enter="submit" />
<input @keyup.alt.enter="clear" />
|
.exact modifier 可以指定当且仅当某些键被按下。
1
2
|
<!-- this will only fire when Ctrl and no other keys are pressed -->
<button @click.ctrl.exact="onCtrlClick">A</button>
|
有的时候,我们需要将某个可输入 element 的值与我们的某个变量建立同步关系。
1
2
3
|
<input
  :value="text"
  @input="event => text = event.target.value">
|
提供了 v-model 这样的 syntax sugar.
使用 v-model 时,默认值要在 data 中设置,在 html 中设置默认值会被覆盖。
checkbox 可以绑定数组。
 1
 2
 3
 4
 5
 6
 7
 8
 9
10
|
<div>Checked names: {{ checkedNames }}</div>

<input type="checkbox" id="jack" value="Jack" v-model="checkedNames">
<label for="jack">Jack</label>

<input type="checkbox" id="john" value="John" v-model="checkedNames">
<label for="john">John</label>

<input type="checkbox" id="mike" value="Mike" v-model="checkedNames">
<label for="mike">Mike</label>
|
默认情况下,v-model 在每次 input 事件后更新,用 lazy modifier 可以让其在 change 后更新,优化一点性能。
1
2
|
<!-- synced after "change" instead of "input" -->
<input v-model.lazy="msg" />
|
lifecycle hooks 可以在特定时刻执行相应的操作。
1
2
3
4
5
|
export default {
  mounted() {
    console.log(`the component is now mounted.`)
  }
}
|
watch 可以监视某个 reactive state 是否改变,如果改变则执行代码。
 1
 2
 3
 4
 5
 6
 7
 8
 9
10
11
12
13
14
15
16
17
18
19
20
21
22
23
24
25
26
27
|
export default {
  data() {
    return {
      question: '',
      answer: 'Questions usually contain a question mark. ;-)'
    }
  },
  watch: {
    // whenever question changes, this function will run
    question(newQuestion, oldQuestion) {
      if (newQuestion.includes('?')) {
        this.getAnswer()
      }
    }
  },
  methods: {
    async getAnswer() {
      this.answer = 'Thinking...'
      try {
        const res = await fetch('https://yesno.wtf/api')
        this.answer = (await res.json()).answer
      } catch (error) {
        this.answer = 'Error! Could not reach the API. ' + error
      }
    }
  }
}
|
watch 默认是 shallow 的,有个 deep watcher. 注意这个可能有性能风险。
 1
 2
 3
 4
 5
 6
 7
 8
 9
10
11
12
|
export default {
  watch: {
    someObject: {
      handler(newValue, oldValue) {
        // Note: `newValue` will be equal to `oldValue` here
        // on nested mutations as long as the object itself
        // hasn't been replaced.
      },
      deep: true
    }
  }
}
|
eager watcher 可以在 created 时也执行一次。
 1
 2
 3
 4
 5
 6
 7
 8
 9
10
11
12
13
|
export default {
  // ...
  watch: {
    question: {
      handler(newQuestion) {
        // this will be run immediately on component creation.
      },
      // force eager callback execution
      immediate: true
    }
  }
  // ...
}
|
默认情况下,state 变更后,会先触发 watch,再进行 component update,此时如果在 watcher 中访问 DOM,得到的是未变更的数据。
解决方案:
1
2
3
4
5
6
7
8
9
|
export default {
  // ...
  watch: {
    key: {
      handler() {},
      flush: 'post'
    }
  }
}
|
可以这样创建 watcher:
1
2
3
4
5
6
7
|
export default {
  created() {
    this.$watch('question', (newQuestion) => {
      // ...
    })
  }
}
|
可以手动停止 watcher,虽然很少用。在创建 watcher 时把对象保存下来,call 它就会停止。
1
2
3
4
|
const unwatch = this.$watch('foo', callback)

// ...when the watcher is no longer needed:
unwatch()
|
尽管用了 Vue 之后大部分时候都不需要直接访问 DOM,Vue 还是有着相关的功能。
用 ref 来指定 element,类似于 ID.
必须在 mounted 之后才能用 $refs 来访问元素。
 1
 2
 3
 4
 5
 6
 7
 8
 9
10
11
|
<script>
export default {
  mounted() {
    this.$refs.input.focus()
  }
}
</script>

<template>
  <input ref="input" />
</template>
|
v-for 和 ref 搭配时,会生成一个数组,但不保证原序。
 1
 2
 3
 4
 5
 6
 7
 8
 9
10
11
12
13
14
15
16
17
18
19
20
21
22
|
<script>
export default {
  data() {
    return {
      list: [
        /* ... */
      ]
    }
  },
  mounted() {
    console.log(this.$refs.items)
  }
}
</script>

<template>
  <ul>
    <li v-for="item in list" ref="items">
      {{ item }}
    </li>
  </ul>
</template>
|
ref 还可以指向一个 function,元素本身的 reference 会成为参数。
1
|
<input :ref="(el) => { /* assign el to a property or ref */ }">
|
ref 可以用在 component 上,得到对应的 component obj. 尽量避免这种用法,因为它会在 parent 与 children 之间建立强耦合。
 1
 2
 3
 4
 5
 6
 7
 8
 9
10
11
12
13
14
15
16
|
<script>
import Child from './Child.vue'

export default {
  components: {
    Child
  },
  mounted() {
    // this.$refs.child will hold an instance of <Child />
  }
}
</script>

<template>
  <Child ref="child" />
</template>
|
vue 中的 component 一般使用 Single File Component(SFC) 定义,以 .vue 为文件名后缀。
使用 component 一般需要 import + register.
 1
 2
 3
 4
 5
 6
 7
 8
 9
10
11
12
13
14
|
<script>
import ButtonCounter from './ButtonCounter.vue'

export default {
  components: {
    ButtonCounter
  }
}
</script>

<template>
  <h1>Here is a child component!</h1>
  <ButtonCounter />
</template>
|
SFC 建议使用 PascalCase 命名。
Component 之间的信息交互使用 prop.
 1
 2
 3
 4
 5
 6
 7
 8
 9
10
|
<!-- BlogPost.vue -->
<script>
export default {
  props: ['title']
}
</script>

<template>
  <h4>{{ title }}</h4>
</template>
|
1
2
3
|
<BlogPost title="My journey with Vue" />
<BlogPost title="Blogging with Vue" />
<BlogPost title="Why Vue is so fun" />
|
定义好的 prop 变成了 element attr.
而 component 可以自己定义事件,用 $emit.
1
2
3
4
5
6
7
|
<!-- BlogPost.vue, omitting <script> -->
<template>
  <div class="blog-post">
    <h4>{{ title }}</h4>
    <button @click="$emit('enlarge-text')">Enlarge text</button>
  </div>
</template>
|
1
2
3
4
|
<BlogPost
  ...
  @enlarge-text="postFontSize += 0.1"
 />
|
emits 不强制显性定义。
1
2
3
4
5
6
7
|
<!-- BlogPost.vue -->
<script>
export default {
  props: ['title'],
  emits: ['enlarge-text']
}
</script>
|
slot 则这么用:
 1
 2
 3
 4
 5
 6
 7
 8
 9
10
11
12
13
14
15
16
17
|
<AlertBox>
  Something bad happened.
</AlertBox>

<!-- AlertBox.vue -->
<template>
  <div class="alert-box">
    <strong>This is an Error for Demo Purposes</strong>
    <slot />
  </div>
</template>

<style scoped>
.alert-box {
  /* ... */
}
</style>
|
可以用 component :is 来动态切换 component.
1
2
|
<!-- Component changes when currentTab changes -->
<component :is="currentTab"></component>
|
value 可以是 component name 或者是 component obj.
默认情况下是直接创建新的 component,不会保存状态。为此可以使用 KeepAlive 的 built-in component.
1
2
3
4
|
<!-- Inactive components will be cached! -->
<KeepAlive>
  <component :is="activeComponent" />
</KeepAlive>
|
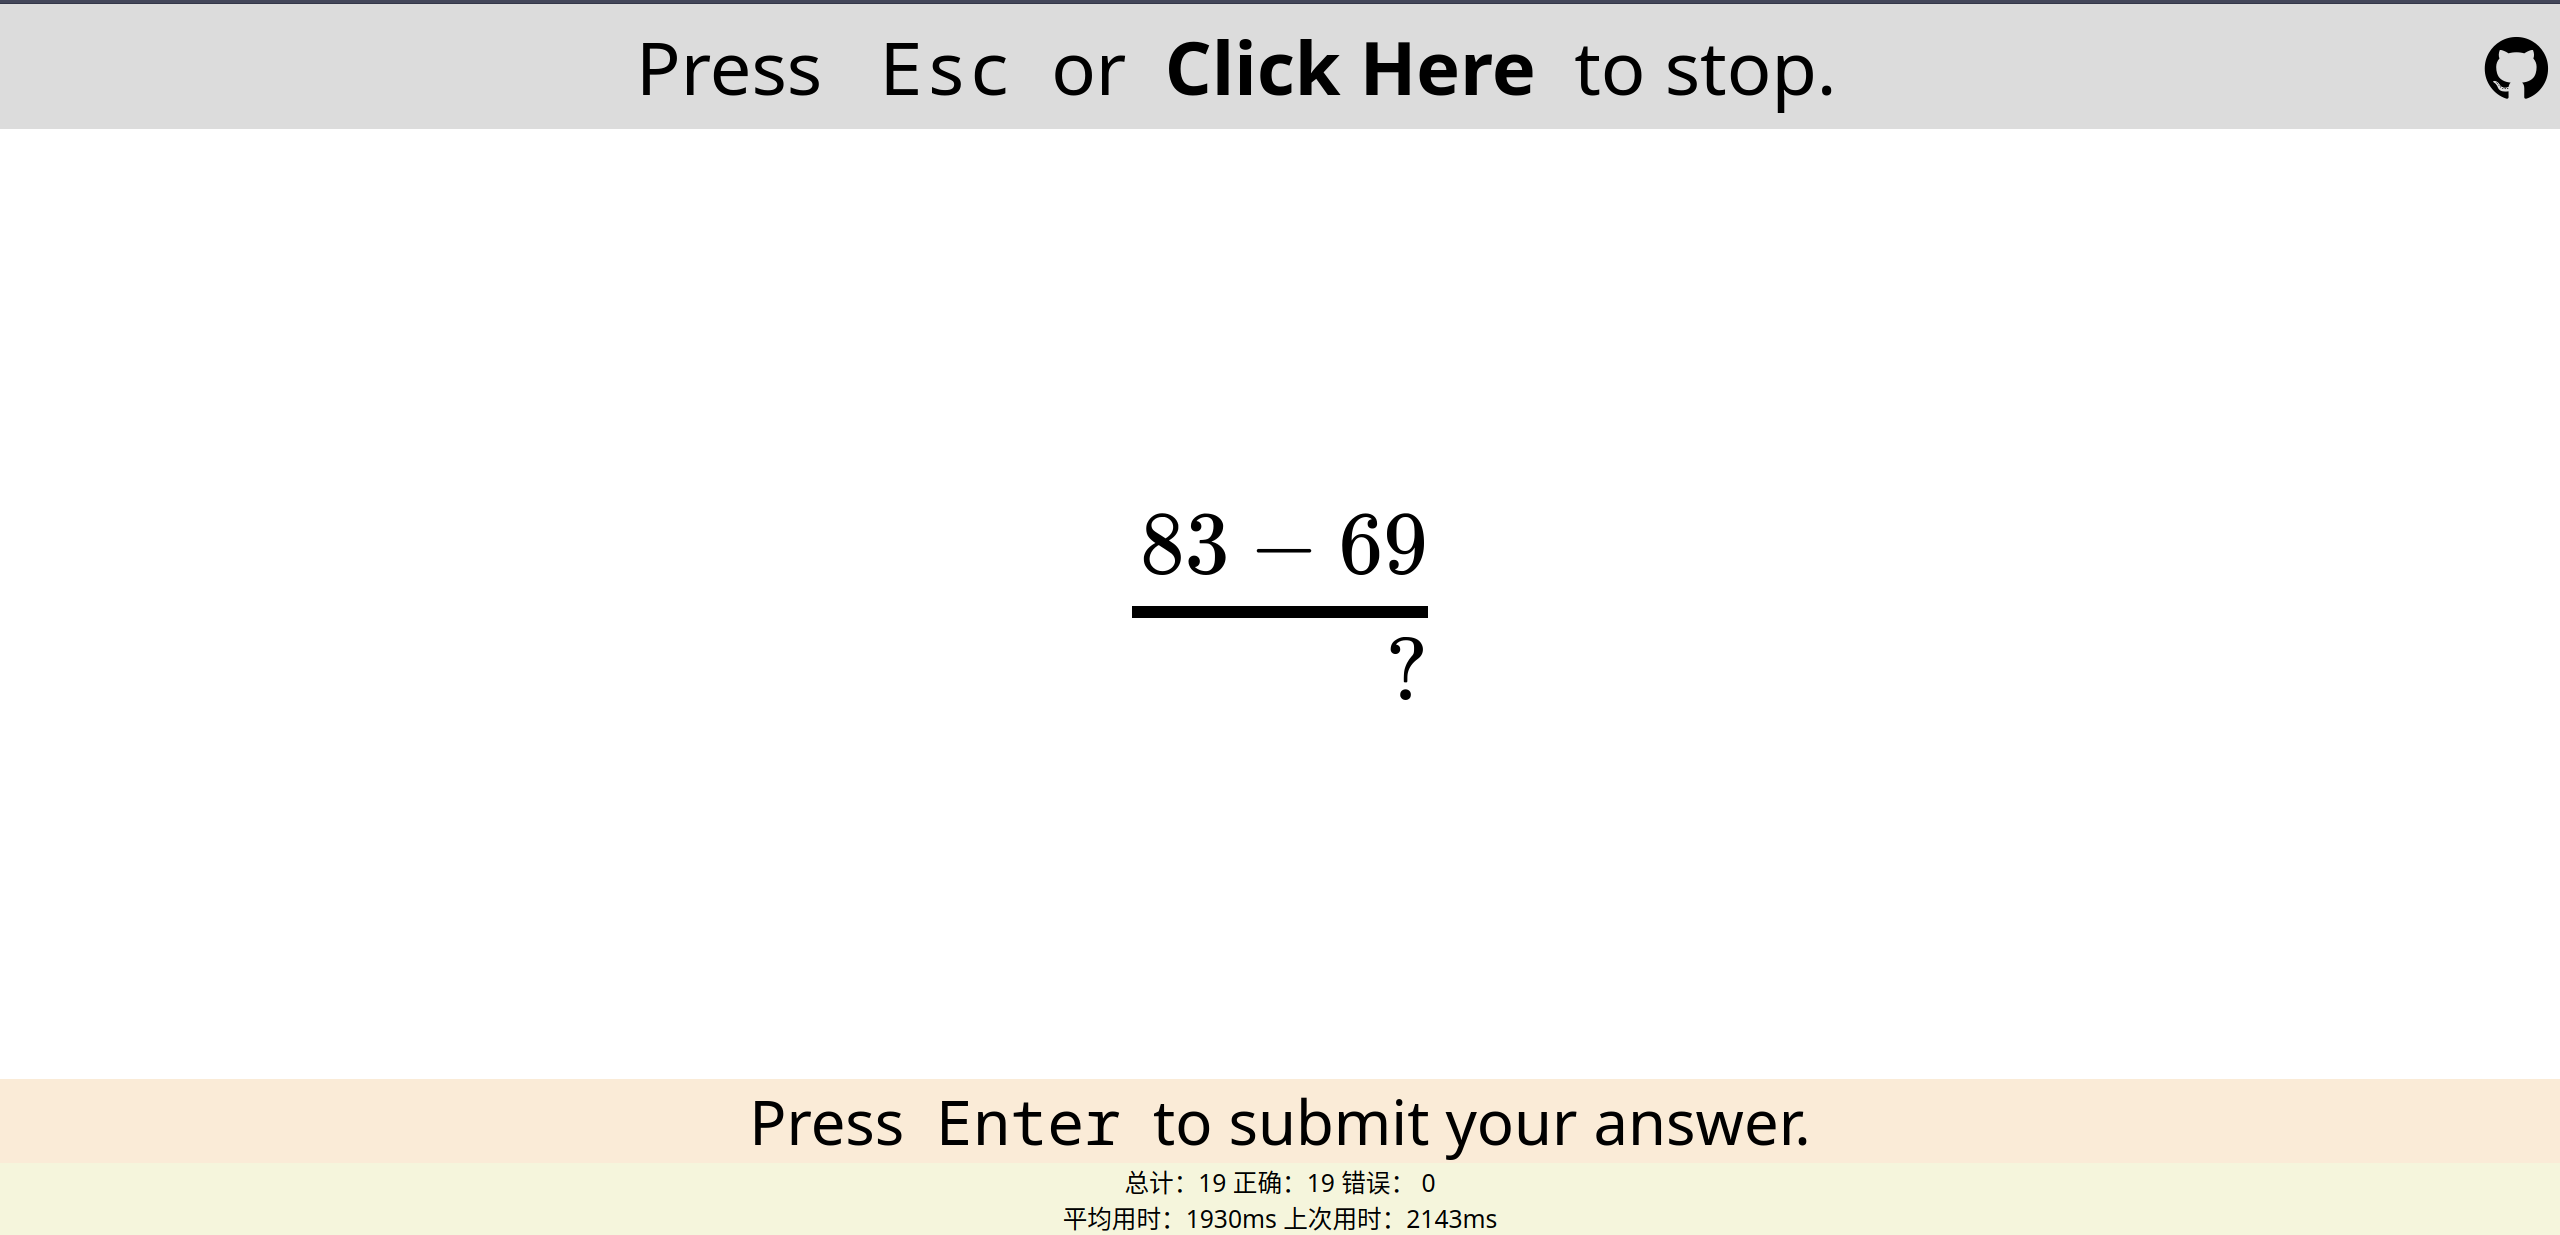
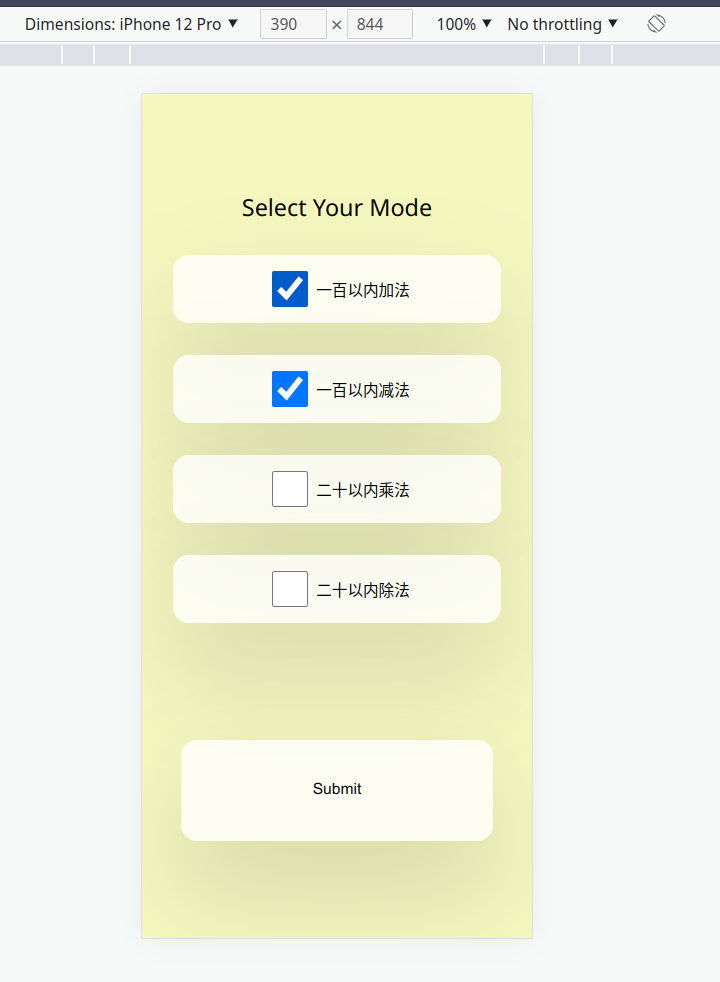
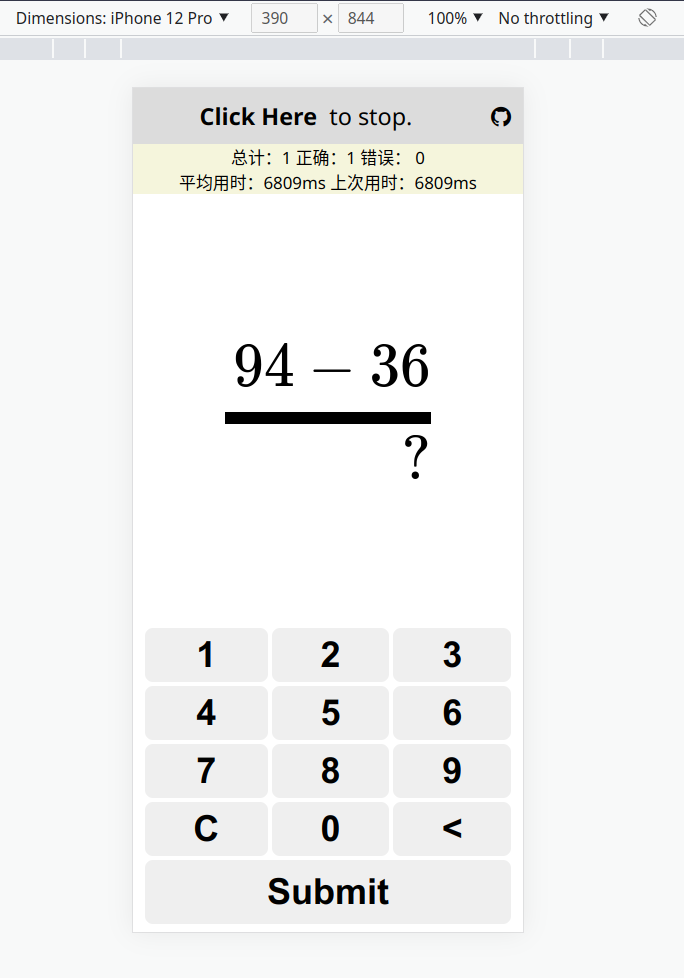
Project Primary-Math-Trainer
使用 Vue 重构我们可爱的小学数学计算训练器。
Vue 的 Component 可以做到模块化,有点 OOP 的味道。
写起来还挺方便的,用 template 写动态页面也比较舒服。适配 Mobile 也可以在同一个 component 上用 v-if 比较方便地完成。
像是从刀耕火种变成了机器农业hhh
下一步应该是学一个 css framework,让界面更加好看一些。
然后再速成个 backend,我的 web dev 玩票入门就完成了。
可惜最近要开学了,时间不足,不然可以来个 7Days Into Web Development. :)